• Skip to main content

Cut Lunch Adventures

TREK | LEARN | ENJOY

  • Adventure Resources
    • 1. Adventure Ideas
    • 2. Trek Preparation
    • 3. On Adventure
    • 4. Post-Adventure
    • Tools & Calculators
    • Insurance for Trekking and Mountaineering
      • Insurance for Trekking and Mountaineering
      • Insurance for Australians
      • Covid Insurance
    • Shop
    • Useful Links
  • Where To Go
    • Trek Finder Wizard
    • Himalayas
    • New Zealand
    • Australia
    • North America
    • South America
    • Europe
    • Asia
    • Middle East
  • Self Discovery
  • Fun
  • About
    • Our Story
    • How We Can Help You
    • Testimonials
    • Why Cut Lunch?
  • Contact
    • Contact Us

Trekking

Tibet: A journey through the past

Published October 2019 by Trevor. Updated May 2025.

In this post:
  • Introduction – Tibet journey
  • Lhasa
  • Shigatse
  • Mt Everest (Chomolungma) Base Camp – North Side (5,200m/17,060ft)
  • Cho Oyu Advance Base Camp (5,800m/19,028ft)
  • Shishapangma (North) Base Camp (5,157m/16,919ft)
  • Insights

Introduction – Tibet journey

Tashi Dele! “Hello, Welcome!”. Our journey through Tibet had started. In the forgotten kingdom of Tibet, much has changed since China took control in 1950. Fast forward nearly 70 years and Tibet is still changing – very rapidly I might add. For the better? Well, that depends on your perspective in terms of how you perceive change.

Road out of Lhasa
Road out of Lhasa

We visited Tibet to enable us to trek up to Cho Oyu Advance Base Camp with a climbing expedition. Coupled with a visit to Shishapangma Base Camp (North side) plus Everest Base Camp (North).

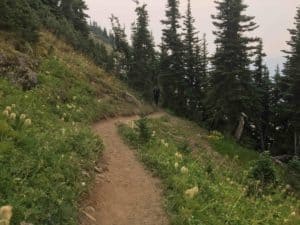
This was always going to be a ‘trek’ with a difference. Firstly, given the vast distances we had to cover (some 1,400km/869mi), driving was always going to form a large chunk of our trip. As for trekking, well unfortunately this time around it had to play second fiddle. Getting up and over several 5,000m passes certainly helped with the new and improved roads, making for easy access to the interior all of which was a blessing.

Road sign to Everest

The Tibetans are getting on with their lives the best way they can, though are very limited to the type of jobs they can apply for, type of vehicles they can own and are not allowed to travel outside of the Tibet Autonomous Region (TAR). We must have encountered some 30 police or other check points along the way for locals and tourists alike. But hey, the Tibetans can still dance and have some fun as we discovered first hand in Lhasa.

Potala Palace
Potala Palace in Lhasa

Lhasa

Flying into Lhasa has a certain charm about it, even at 3,700m / 12139ft. Lhasa still maintains a vibrant culture and the food is great. Having a cup of tea at a local tea house with local Tibetans was a real bonus.

Potala Palace, rebuilt in the 17th century, was the winter palace of the Dalai Lamas from 1649 to 1959 and has been a museum since then. Now a world heritage site, its now a bit of a tourist trap. Most if not all of the historical artefacts have been moved back to Beijing for ‘restoration purposes’. Plus, many of the old rooms have been closed to visitors so you are only permitted to wander around inside as the authorities wish.

Dancing in Lhasa
Locals dancing in Lhasa

With hordes of tourists lining up to go in (and this wasn’t even peak season), we chose to walk around the outside as the local Tibetans do on a daily basis. We recommend this! Find where they are dancing and join in. And for good measure, go and exercise with them. You are guaranteed lots of laughs and enjoyment.

Exercising in Lhasa
Exercising with the locals in Lhasa

Shigatse

From Lhasa we drove to Shigatse, the second-largest city in Tibet. Here, we visited the Tashi Lhunpo Monastery, founded in 1447 by the first Dalai Lama. We were very lucky on the day we visited that the monks were celebrating the end of a prayer cycle. They paraded through the monastery grounds with a great fanfare of Tibetan ceremonial horns and crashing cymbals.

Mt Everest (Chomolungma) Base Camp – North Side (5,200m/17,060ft)

Having trekked to Mt Everest on the South side in Nepal, I have to say I was blown away when I saw Chomolungma from the North side. My first reaction was ‘she’s huge’! My second reaction was how beautiful she looked, even from some 19km away. Having had some friends climb her back in the spring season earlier in the year brought it all home. Being totally exposed to the weather on the North side, it would have been one tough climb!

Everest from the North side - a must-do part of your Tibet journey
Mt Everest from the North side

Base camp (5,200m) was marked with a plaque. Obviously some people hadn’t properly acclimatised, judging by the numerous people around us suffering breathing difficulties. So much so, some were sucking air from a small oxygen canister! Is it a tourist trap? Probably. Is it overrun with local tourists just to tick off a bucket list item and take the obligatory photo? Absolutely. A great example of this was that the majority of people were bussed up and back from Tingri, some 6-8 hours return, making for a long return trip. Instead, we stayed up at Rongbuk, and were rewarded the next morning with some great views. Nevertheless it is still worth making this stop on your Tibet journey.

Project Base8000 at EBC North

Cho Oyu Advance Base Camp (5,800m/19,028ft)

Wow! Not only did we see Cho Oyu (the ‘turquoise goddess’) close up and personal, we also trekked up to ABC with a climbing expedition. Reaching an altitude of some 5,800m, this was definitely not for the faint hearted. Coupled with the weather, the landscape up high was very stark, consisting of a rocky and snowy terrain.

Higher up, the climbers were stopped in their tracks above Camp 1 (around 6,000m). Deep snow hindered their progress and acclimatisation rotations on the mountain. On top of that, we were all informed that everyone had to exit Tibet by 1 October due to China’s 70th anniversary celebrations. This added considerable angst to the climbing party’s summit schedule. The professionalism of sherpas and climbers prevailed, combined with Climbalaya’s excellent logistics and planning. As a result, successful summits were achieved. This included one climber who planned to ski down from the summit!

Nangpa La Glacier near Cho Oyu
The trail to Cho Oyu Advance Base Camp

You can read more about our trek to Cho Oyu Advance Base Camp here which we did as part of our Project Base8000.

Shishapangma Signpost
Shishapangma base camp

Shishapangma (North) Base Camp (5,157m/16,919ft)

We never thought we would make it! The Chinese had officially closed the mountain to all climbers for the season. Plus the reluctance of our Tibetan driver to almost refuse to drive the some 20kms along a very rocky and bumpy gravel road from where the bitumen road ended. We were then chased down by the ‘park custodian’ who cut us off in our tracks, gesturing and demanding some 1,000 Chinese yuan for our right of passage. ‘But it’s normally free to drive to base camp’, we protested – obviously not on this day it wasn’t.

So, after all that, the easy part we discovered was the drive back to the Tibet/Nepal border, overnighting in Kyirong. Crossing over into Nepal the next morning however, was different. We had to navigate some 6 military check posts plus numerous landslides cutting off the road. Reaching Kathmandu some 9 hours later, tasting our first cold beer and experiencing the first hot shower in 2 weeks – all went down very nicely indeed.

You can read more about our trek to Shishapangma Base Camp here which we did as part of our Project Base8000.

Landslide
Landslide on the road back to Kathmandu

Onwards and upwards!

Trevor

Watch the video of our journey through Tibet

Insights

  • Border crossing: The Kyirong Border Crossing is the main crossing between Tibet, China and Nepal. Opening hours are usually 9.30am-2.30pm.
  • The road from the Tibet border to Kathmandu is very rough, with a journey time of 7-8 hours. Much longer during the rainy monsoon season.
  • All foreign travellers must be on an organised tour to visit Tibet.
  • Getting to Tibet is not difficult as long as you use a reputable travel agency.
Local transport
Local transport
  • Any travel agency you use, either in Kathmandu or based in Tibet, will take care of all travel arrangements for you inside Tibet including organising your visa and permit (you need both).
  • As China only has one time zone, Tibet is 2 1/4 hours ahead of Kathmandu. This means the sun rose very late around 7:30am!
  • Social media such as Facebook, Twitter, Instagram plus all Google applications are blocked. If you install a VPN on your phone before arriving in Tibet then it’s possible to access these apps. However this only seems only to work if you’re using mobile data, not wifi. You can’t install VPNs once in Tibet.

Trekking Supplies Calculator

Published August 2019 by Cut Lunch Adventures. Updated July 2025.

Hi I’m Barry the TrekBot – your trekking supplies calculator.

The TrekBot

Listen to my welcome message here:

I take the guesswork out of packing for treks at both low and high altitudes. Calculate how many of these consumable items to take on your trek.

  • SNACKS: muesli bars and chocolate bars
  • HYGIENE: tissues, hand sanitiser, face/body wipes, toilet paper
  • PAIN RELIEF: pain/fever tablets, anti-inflammatory tablets
  • HYDRATION: electrolytes

If you prefer, you can download the calculator in Google Sheets here, or if you’re wanting a more comprehensive calculator for all items including clothing then download the Trekking Gear List at the bottom of this page.

Submit

You can also read our page on how to prepare for your trek which covers gear, fitness and mental toughness.

Happy trekking!

Download the Summer Hiking Gear List
Download the Winter Hiking Gear List

Download the Trekking Gear List (Google Sheets)

Check out our Amazon store HERE. You can see trekking and travel items that we use or recommend, including gift ideas. As Amazon Associates, we may earn a small commission from qualifying purchases, at no extra cost to you.

Also see our other handy tools and calculators here.

Disclaimer: These calculations should be referenced as a general information source only and should be used solely at your own discretion, risk and liability. Please see our website terms of use for more detail.

Trekking For Beginners

Published August 2019 by Trevor. Updated February 2022.

In this post

Introduction

  1. Start with Half Day Hikes
  2. Progress to Day Hikes
  3. Test Your Endurance on Multi-Day Hikes
  4. Understand Altitude
  5. Go Trekking!

Introduction to Trekking for Beginners

Whether you’re new to trekking or want to resume from years past, you will need to start somewhere. You’ve maybe talked to people? Bought or borrowed gear? Got your group together or not? Paid your deposit? So, what’s next you may ask?

Well, that depends on your objective and where you’re starting from. If for example, you’re wanting to achieve a 2-3 week trek in the Himalayas or anywhere else then you need to work up to it. We’ll show you 5 simple steps to get you there – starting from short hikes then progressing to longer multi-day hikes and finally your trek.

trekking for beginners

Practice makes perfect

From our experience, you need to practice. Practice makes perfect so they say! Plus, it’s a great opportunity to not only test and fine tune gear but also yourself, in all sorts of weather and terrain.

For example, we were planning a trip back to the Himalayas, deciding to hit up our local trails around where we lived. The weather was absolutely atrocious with Sydney encountering ‘cyclonic’ rain – in fact the heaviest rain in a day that Sydney had ever experienced. So heading out with our ‘lucky’ gore-tex raincoats, this was a test in the extremes. Well, guess what? They leaked like a sieve, so re-waterproofing was a must. Now imagine if we had taken off up to the remote Himalayas encountering a snow storm or heavy rain without testing our gear.

The above is just one example, but I could share with you other stories around choosing the right boots, backpack, trekking poles and clothing just to name a few.

So, let’s get started. It is recommended that you progress through these 5 steps for trekking for beginners. At any stage you can also refer to our section on how to prepare for a trek, which covers the 3 secrets to success – gear, fitness and mental toughness.

Spit to Manly Walk, Sydney

1. Start with half day hikes

Begin with short half day hikes of around 3-4 hours in your local neighbourhood. To start, don’t make it too tough, but you still want to test out those boots you’ve just bought, plus your pack amongst other things. Load your pack up with around 3-5kg to start, then progress from there over the next few weeks, building up your stamina slowly. Even on short hikes make sure you are taking sufficient gear e.g. clothing, rainwear, sun protection, first aid, water and snacks.

High Note Trail, Whistler, Canada

2. Progress to day hikes

Now you’re ready to progress to full day hikes. Try staying out for at least 6-7 hours – find some hills and other varied terrain. Great for testing out boots and yourself, especially any niggling injuries such as knees or ankles. Try firstly without trekking poles – then poles. Did it make any difference? How was your stability going uphill then coming down? How did your body cope with hours on the trail? Hydration – which works best, water bladder or bottles? Go out in gnarly weather – how did you cope? Work up to carrying heavier loads e.g. 10-12kg.

3. Test your endurance on multi day hikes

Now, here comes the serious stage. Multi day hikes (2-5 days) are great for testing how you handle walking day after day on the trail. You’re also sleeping out in the wilderness. You need to carry different gear and supplies and manage your water. Mental toughness also springs to mind. We are often reminded that the trek is 20% physical and 80% mental. How will you handle all the things that you think will go wrong? Plan for the worst – hope for the best. It can be helpful to go with a guided group to make life easier, especially if its your first overnight hike.

Everest Base Camp
Everest Base Camp

4. Understand altitude

They say nothing prepares you for altitude, other than altitude itself. Trekking for beginners would not be complete without a section on this. If you’re trekking in the Himalayas, Machu Picchu or planning to climb Kilimanjaro, you need  to start thinking about altitude risks. Areas are often considered ‘high altitude’ if they reach at least 2,400m (8,000ft) above sea level.

Research beforehand about acute mountain sickness (AMS) and a plan to prevent it. For example, how many acclimatisation days do you have built into your itinerary? What is your hydration strategy? Do you have the correct insurance for rescue in case things go wrong? If you don’t think AMS is serious, remember this little known fact. More than 10% of people trekking to Everest Base Camp (5,380m/17,600ft) get evacuated before they even get there. Why you may ask? Well, from our research, we’ve observed that it is mostly from AMS. People heading up to altitude too quickly, not enough acclimatisation rest days, don’t hydrate, booking with a cheap operator – all of these are just some examples.

Everest Base Camp Trek - good trekking for beginners
Everest Base Camp Trek

5. Go trekking!

If you’ve followed the above plan for trekking for beginners then there’s nothing left but to go trekking! Start here to see our ideas for how to enjoy and get the most out of your trekking adventure.

Your Guide To Successful Adventure Projects

Hiking vs Trekking

Published July 2019 by Emma. Updated February 2021.

Hiking vs trekking – it all depends on where you come from, what you’re doing and where you’re going.

So what is trekking or any other variation of walking? You can call it what you like but this is how we see it.

Trekking

Multi-day hiking usually in mountainous areas and over an extended period of time. This term is typically used for ‘hikes’ in the Himalayan and Karakoram Ranges, Africa and South America. Often this involves the option to have porters to carry overnight gear while trekkers carry enough for the day in their backpacks. Trekking is also used to describe the Kokoda Track in Papua New Guinea – a trek through wartime history and local culture.

Hiking

Long walks out on trails with a backpack – these could be single-day or multi-day hikes.

Tramping

Hiking in New Zealand. There is a great network of ‘tramps’ in New Zealand, including the Great Walks. These are maintained by the Department of Conservation. There is also the Te Araroa Trail which goes the length of New Zealand.

Bush-walking

Hiking in Australia. Each State or Territory in Australia maintains it’s own trails and there is a great variety of climates and landscapes to choose from.

Thru-hiking

Multi-day hiking. A term used in the USA – e.g. the Pacific Crest Trail and the Appalachian Trail.

Section-hiking

Hiking long distance trails in separate stages. A term more commonly used in the USA.

Walking, Hill-walking and Rambling

Various terms to describe hiking in the UK.

Backpacking

Either travelling the world with your backpack, or thru-hiking carrying everything with you on your back.

Pilgrimage

A long journey to a sacred place e.g. the Camino de Santiago or Japan’s Kumano Kodo or the trek around Mt Kailash in Tibet China.

Mountaineering

Climbing mountains which require the use of ropes and other technical gear like crampons and ice axes.

Hiking vs trekking

Hiking vs trekking – we hope this has helped explain the difference between hiking and trekking and a few other terms!

Now get started on your adventure or check out our guide to trekking for beginners.

Hiking vs trekking

Australia: Bay of Fires Walk, Tasmania

Published July 2019 by Trevor. Updated July 2020.

After flying into Launceston, it was time to meet our team and head off on our 3 day Bay of Fires walk. We organised the walk through Life’s an Adventure.

Moody scene on the Bay of Fires Walk

Situated on the east coast of Tasmania, this magical and remote landscape showcases pure white perfect beaches, vivid orange granite boulders and sapphire and emerald seas.

Colours of the Bay of Fires

Staying a night at a local ‘beach shack’ was a treat. Coupled with eating the local produce and sampling local wines, all of which assured you of a great night’s sleep and being suitably charged for the next day.

White sand beaches
White sand beaches

There is often a debate between guided and unguided hikes. We chose the guided one, as being newbies to the region we wanted to learn as much as we could about the area. From the history and geography through to the stunning landscape, we weren’t left disappointed. Bay of Fires is a truly stunning destination and a photographer’s paradise.

Big skies and beaches

Onwards and upwards!

Trevor

Varied terrain on the Bay of Fires Walk

Insights

  • Distance is around 33km/20.5mi, and it’s classed as a moderate walk.
  • However you still need to take good footwear as you will be walking over rocks, beaches and other varied terrain.
  • For example there is lots of beach walking, rather than bush-walking.
Looking back towards the lighthouse
  • Water is readily available.
  • If you’ve never been to Launceston, it’s worth leaving a spare day to explore.
  • Read more information on the Life’s an Adventure Bay of Fires Walk here
  • You can also consider one of the many other hikes in Tasmania. For example read our post on the Three Capes Track
Plenty of sea views
Plenty of sea views!
  • « Go to Previous Page
  • Page 1
  • Page 2
  • Page 3
  • Page 4
  • Page 5
  • Page 6
  • Interim pages omitted …
  • Page 8
  • Go to Next Page »
  • Terms of Use
  • Privacy Policy
  • Disclosure

© 2026 · Cut Lunch Adventures